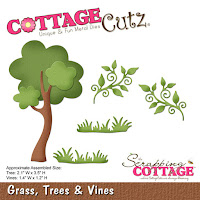
Showing posts with label Trees & Vines. Show all posts

Thursday, June 03, 2021

Best of Cluck!

Hello Scrapping Cottage Friends 

It is Pam creating with you today!

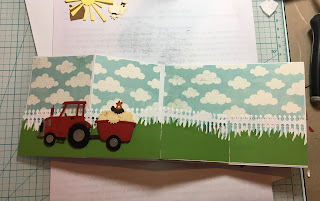
IT IS NEW RELEASE TIME! The collection is called COUNTRY FARM! It has the most delightful dies.  Everything from Tractors to Cowboy Chicks!  Each die is just full of awesome details and can be used for so many different occasions.  Today, I am using the Farm Tractor w/Trailer as a best of luck z-fold card.


Design Steps:

1.  Using the Tractor w/Trailer die cut all the pieces.  I used red, black, silver, brown and acetate for the window and head light.  I also used the Stacked Farm Animals for the additional chickens.  And the Grass, Tree and Vine die for the background tree.  Shade and assemble all pieces
2.  For the base of the z-fold card I used a white piece of card stock 4 x 11.  Fold it in half and then fold the front fold in half again.  For the little z-fold white strip I cut a 1 x 11 inch strip.  This strip is scored at 2 3/4 x 5 1/2.  

3.  Before attaching the strip glue down your cloud DP 2 panels at 2 5/8 x 3 7/8 and 1 panel at 5 3/8 x 3 7/8.  Next use your Grass Slimline die and cut 2 pieces of green grass about 1 inch high.  Also cut 4 pieces of white fence using the Victorian Fence die.  Glue the fence to the back of the grass and then glue to the z-fold strip.  Using the Stitched Sun, Cloud and Umbrella die cut out a sun in yellow
4.  Pop up the Tractor and Trailer to the card as shown.  Add the sun to the upper left corner
5.  Glue the tree flat to the back panel as shown.  Glue the 2 additional chickens and bags of grain to the card as shown.  Add the sentiment and your card is finished

CottageCutz Products


Thank you all for stopping by and be sure to check out this adorable new release!

Take Care and Blessings
Pam


Wednesday, June 21, 2017

Let's Go Fishing! Double-Fold Card


Hello Scrapping Cottage friends! It's Janet from SugarShine Designs with a masculine card for you today. This card is called a double-fold card and is also known as a Joy card fold. By complete coincidence, Lois posted this same card fold on Monday except she turned it so that the card opened up vertically. My card opens up horizontally but is otherwise very similar. This is a nice fold because it starts out a normal A2 size but once opened expands to three panels and 10.25" wide.


I used many different die sets to create this project but if you don't have all of them, just substitute with different dies. This same idea can work on a number of different themes. Just start by thinking about what you want to use for the closure and then go from there.

In my case, I started with the tree from the Grass, Trees & Vines set and built the rest around the outdoors theme. I also used all the dies from the stamp and die set called Woodlands. The detail in these stamps and dies are awesome. You can color these any number of ways but I chose to use my PrismaColor pencils. I colored the dies from the Fishing Gear set with distressed ink. 

For complete instructions and dimensions, please visit the CottageCutz YouTube Channel by clicking on the video image below. As always, ask any questions you have and give me a thumbs up if you enjoy the video. If you haven't already, please subscribe so that you won't miss any future CottageCutz videos. We are very close to 500 subscribers! Thank you for supporting the channel. We appreciate every one of our CottageCutz fans across all of our social media platforms.

 Click here for video

Dies Used in This Card:


Thanks for spending some time today with me and the Scrapping Cottage. See you again soon!

- Janet
SugarShine Designs

Wednesday, July 13, 2016

Screen Divider Card + Tutorial


Hello Scrapping Cottage friends! Thanks for taking the time to stop and visit today. It's Mary Marsh here bringing you the Wednesday edition of the Blog.

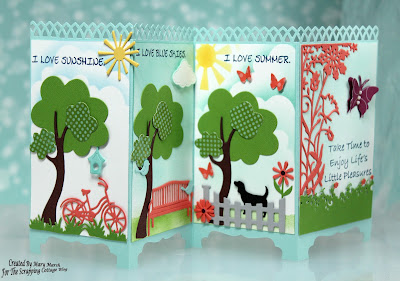
Today for your viewing pleasure, I am featuring dies from both the May "this & that" release & the June "home sweet home" release. I have also created a screen divider card and I will give you all the details on how you can create one as well. You can use your CottageCutz dies in a fun and creative way with this style card.

Card Base: 5 1/2" x 11"
Decorated Panels: 2 5/8" x 4 1/4"

Step 1: Score 5 1/2" x 11" cardstock at 2 3/4", 5 1/2", and 8-1/4" in the horizontal position.

Step 2: To create the Screen Divider fold, fold in half at 5 1/2" score then fold each side back in the opposite direction on the scored lines.


Step 3: Unfold card and lay flat. Using a border punch, create a punched border along the top edge of the card. I used a Martha Stewart trellis punch. I started punching at the 5 1/2" center point and worked my way across the card.
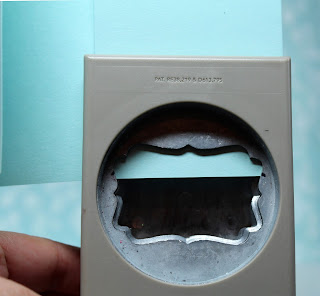
Step 4: To create "legs" at the bottom of the screen you can either use a punch or a die. For my card I used a punch. I worked with half of the card at a time. Keeping the two left panels folded, slide the bottom of those two panels into the punch (only 2 layers at a time will work). Position the cardstock about one-third of the way into the punch and center side to side, then punch.


Step 5: The screen divider is ready for decorating.

I started my 1st panel by sponging in some clouds with a light blue ink using a cloud template.
Die-cut the pieces for this panel using the grass, trees & vines, build-a-house accessories, spring stamps and fancy pocket plus dies. Bike is cut in a coral cardstock, tree in gumball green and matching patterned paper, birdhouse in pool party.
 
The next panel I used the same light blue ink to sponge the panel and a medium green for the grassy area. The dies are from the same sets listed above.
 
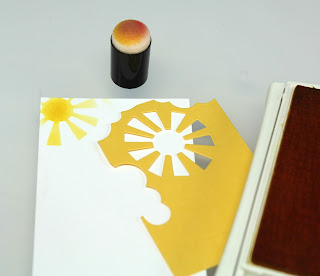
The 3rd panel is using the same dies listed above plus the garden accessories & hello spring dies. I cut a stencil from the clouds & sun die and sponged in the sun in the upper corner. I also added clouds and a grassy area. I wanted some small butterflies so I used a punch for those.


On the last panel I used the spring bloom corner and the bicycle in grass  and the fancy pocket plus dies. I sponged the background in the light blue ink. My corner is cut in coral cardstock and the butterflies in a rich razzleberry cardstock.
 
 
I adhered the panels to the screen divider and to hold in place I used some light blue ribbon that matches the card base.


Here are some other close-up shots of the card panels.


And, that my friends is my card for this week. Thanks for sticking with me till the end of this post. I know it was a long one. Don't forget about our current challenge. This one is Greenery. Get more info here. So until next time......inky hugs.
http://www.scrappingcottage.com/cottagecutzbuild-a-houseaccessories.aspx

http://www.scrappingcottage.com/cottagecutzgardenaccessories.aspx

http://www.scrappingcottage.com/cottagecutzcloudsandsun.aspx

http://www.scrappingcottage.com/cottagecutzgrasstreeandvines.aspx
http://www.scrappingcottage.com/cottagecutzfancypocketplus.aspx

http://www.scrappingcottage.com/cottagecutzspringstamps.aspx
http://www.scrappingcottage.com/cottagecutzspringbloomcornerelites.aspx