Showing posts with label Spring Grass. Show all posts

Thursday, October 12, 2023

Count Your Blessings

Hello Friends 

It is time to show off our new RELEASE!  It is our Fall Designs for 2023.  Perfect for those Thanksgiving cards and fall birthdays. The new dies are in the online store.  There are 15 designs.  

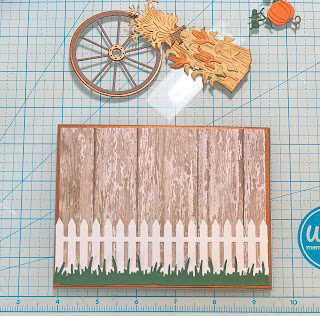
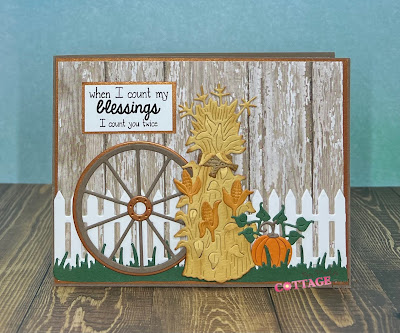
I am sharing a card using the Fall Wagon Wheel and the Harvest Cornstalk.

 
Design Steps:
1.  Using the Harvest CornstalkPicket Fence Border, Spring Grass and the Fall Wagon Wheel cut out the following colors of card stock:  white, brown, yellow, orange yellow, orange, green and copper.  Shade the cornstalk with TH vintage ink.  Then assemble the pieces with a fine tip glue
2.  For the card base use an A2 brown piece of card stock, 4 1/8 x 5 3/8 piece of copper card stock and a 4 x 5 1/4 piece of wood DP
3.  Glue the copper piece to the brown card base and then add the wood DP.  Glue the fence down and then add the grass
4.  Place the wagon wheel to the left and then add dimension dots to the back of the cornstalk and pop it on next to the wheel
5.  Last add the pumpkin, vine and then the sentiment.  Your card is complete


We have more inspiration on our YouTube Channel check it out HERE

Thanks so much for stopping by!  And I will see you next Thursday.

Blessings and Take Care


Thursday, May 25, 2023

You're Tweet

 Hello Friends

It is Pam creating with you today!

I am making a few thank you cards for my stash.  I am also making some for our little sale at church.  It helps pay for our teens to be able to go to summer camp.  The die I am using is the Fence w/ Flower Garland from the Flowers and More release.  Also used on this card is an oldie Tree of Nature.


Design Steps:


1.  Using the Fence w/Flower Garland cut out white, green, yellow and blue card stock.  Using the Tree of Nature die cut out brown, green, blue (bird), yellow(cage) and light brown(bird).  Using the Spring Grass die cut out green card stock.  Assemble with a fine tip glue

2.  Cut a piece of white card stock 3 1/2 x 4 3/4.  Blend blue ink onto the card stock and then splatter with water

3.  Begin to assemble the card starting with the grass making sure to only put glue at the very bottom of the grass so you can tuck in the tree and then the fence

4.  Add the leaves, birdcage and bird to the tree

5.  Stamp your sentiment in black in to the right of the tree.  (I decided I didn't like the way it looked so I stamped the sentiment on white and layered it with the blue). Use a A2 white card base and a 4 1/8 x 5 3/8 piece of embossed white card stock.  Glue your embossed piece to the card base and then glue the blue panel to the white embossed piece


6.  When I have left over scraps from the card I like to use them inside.  It is a really good way to use them up along with any extra dies that didn't get put on the front of the card

CottageCutz Products


We have more inspiration on our YouTube Channel check it out HERE

Thanks so much for stopping by!  And I will see you next Thursday.

Blessings and Take Care


Thursday, April 20, 2023

Thank You Tulips

 Hello Friends,

It is Pam creating with you today!   

The flowers in this Easter collection are so versatile and gorgeous.  They would be perfect for a mother's day card, thank you, sympathy or just about anything! I am using the Spring Tulips for my Thank You card.


  Design Steps:

1.  Use a cream A2 size base, cut a piece of cream 4 x 5 1/4 you can use a cover plate or embosing folder for the background.  Use the Spring Tulips die and cut the tulips and leaves out of white card stock
2.  Use 2 shades of orange and yellow to ink up the tulips.  Use two shades of green to ink up the leaves and stems.  Assemble the flowers with a fine tip glue
3.  Use the Slimline Picket Fence die and cut it out of white.  Then glue it to the textured piece of cream.  Next use the Spring Grass die and cut it out of white twice.  Ink the grass with the same inks as the leaves.  Glue down the grass and then add the flowers
4.  Use the Expressions Thanks and cut it twice out of white and then ink with orange.  Glue the thanks to the upper right side of the card as shown and your card is complete

CottageCutz Products


We have more inspiration on our YouTube Channel check it out HERE

Thanks so much for stopping by!  And I will see you next Thursday.

Blessings and Take Care


Thursday, May 05, 2022

Aussie Smiles

Hello CottageCutz Friends,

It is Pam sharing with you on the blog today!

I have created a slimline card today featuring a number of the Australian Friends dies.  This sweet card uses the WombatDingo and the Echidna dies.  There are 14 different dies in this release and all of them are just as cute as they can be!!  If you haven't checked out the Australian Friends Release click HERE. 

Design Steps:
1.  Using these dies: DingoWombat and Echidna cut out the following colors of card stock: rust, tan, brown, dark brown, white and black.  Assemble the critters with a fine tip, fast drying glue
2.  For the white card base use a slimline measuring 8 1/2 x 3 1/2 (folded) Cut a piece of black card stock with the Film Strip Slimline.  Also with the same slimline cut out the Smile which is included in the Film Strip Slimline.  Cut a piece of blue DP 3 1/4 x 2 1/4 glue to the center of the white card base
3.  On the card front glue down the film strip and the smile as shown in the picture above
4.  For a little added decoration use the Spring Grass die and cut it 3 times out of green card stock.  Cut the pieces to fit inside of the film strip sqaure and glue down.  Use the Koala Bear w/Floral die and cut out 4 green leaves and 2 yellow flowers.  Glue the leaves and the flowers in the corners of the top and bottom film strip squares as shown above
5.  Add the remaining critters and some small rhinestones to the flowers centers.  I decided to do the inside of the card by adding one film strip square and some leaves with yellow flowers.  I stamped inside of the square to complete the card

CottageCutz Products


We have more inspiration on our YouTube Channel check it out HERE
Thanks so much for stopping by!  And I will see you next Thursday.

Blessings and Take Care