Showing posts with label Snowman w/Lamp Post. Show all posts

Tuesday, June 20, 2017

Jolly penguins shaker card

Hi, Janja here!

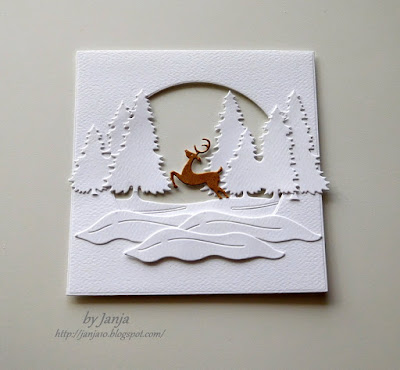
Nice hot weather inspired me to create a shaker card with a winter scene.


Supplies:
- CottageCutz dies: Jolly Penguin, Deer & Forest Border, Snowman w/ Lamp Post, Circle Set
- white card base: 5.3 x 5.3" (13,5 x 13,5 cm), folded
- white cardstock: 4.72 x 4.72" (12 x 12 cm)
- white cardstock: 4.5 x 4.5" (11,4 x 11,4 cm)
- fun foam: 4,3 x 4,3" (11 x 11 cm)
- white and colored cardstock
- transparent foil: 4,3 x 4,3" (11 x 11 cm)
- Cosmic shimmer glitter jewels - iced snow
- Distress Oxide - Broken China

Usually I use a watercolor paper for coloring, but this time I colored on a white cardstock. I also used it for other cutouts.


While we wait for the color to dry, cut out cute penguins from white and colored cardstock.


Cut out deer and spruces of white cardstock twice. Use one cut out entirely, and from the other cut off spruces with scissors. Also cut out deer from brown cardstock.
On the bottom edge add a white cardstock.


Borrow three snowy hills from snowman :).


Cut a hole in a white cardstock with an 8th die in a row from the middle of a set. Do the same with fun foam.


We begin by assembling the card as shown.


Fasten a fun foam on to blue background. Add some glitter in to the opening and cover it with a transparent foil.
Now we only have to fix a white cardstock with a deer and penguins.


Completed card.


I hope you like it and thank you for coming over.


Saturday, February 25, 2017

Easter Cross & Tulips

Hello Scrapping Cottage friends! Thanks for taking the time to stop and visit today. It's Mary Marsh here bringing you the Saturday edition of the Blog.

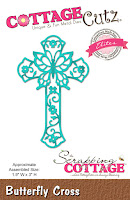
We have some fabulous new Spring dies in the store. Today for your viewing pleasure, I am featuring the Butterfly Cross die.

 I started my card by using this weeks sketch #633 from Splitcoaststampers. Using a sketch almost always is a good starting point for me. When I saw the layout and the rectangle layer in the circle I thought of using the Butterfly Cross die for that part of the sketch.

Daffodil Yellow Card Base: 5 1/2" x 4 1/4"
Patterned Paper Layer: 5 1/2" x 2 7/8"
Circle Dies: 2nd largest in set
Stitched Circle Die: 3rd largest in set

I wanted the card to be bright to reflect the Spring & Easter season. So I looked through my stash first for patterned paper. I chose this lilac striped paper and decided to pair it with a daffodil yellow card base.
I cut the first elements of the sketch: the card base, patterned paper circle, purple layering piece and the scalloped border. For the scalloped border, I used the Sweet Love Border die. When I placed it underneath the patterned paper, I moved it up just to reveal the scallop edge. For the lilac layer above the patterned paper, I cut it 3/4" x 5 1/2". It's not necessary to use a bigger piece of cardstock to layer in this case.
 
I cut the Butterfly cross in lilac. I decided to add some tulips at the base of the cross. The tulip die is from the Hello Spring die set. This was a 2016 spring release. I cut the tulips in yellow to pick up the card base color. Easter sentiment is stamped in Tuxedo Black ink.

The greenery under the tulips is the snow bank from the Snowman w/Lamp Post die set. I cut it then placed it in the circle die and cut it again to get the rounded edge. Just another way to get more mileage out of the dies you already own.
To complete my card, I added a butterfly. I used the butterfly die from the Fancy Pocket Plus die set. I cut it in with the lilac cardstock and then a top layer of daffodil yellow patterned paper. Finished it off with a couple of light yellow pearls. 

Well, that's it for me for this week's post. Just a reminder that we are having a Design Team call right now. You can get all the info here. So until next time.........
 
Dies I used to create card:


http://www.scrappingcottage.com/cottagecutzbutterflycrosselites.aspx
 
http://www.scrappingcottage.com/cottagecutzfancypocketplus.aspx

http://www.scrappingcottage.com/cottagecutzsweetloveborders.aspx

http://www.scrappingcottage.com/search.aspx?find=snowman+w%2flamp+post
 
http://www.scrappingcottage.com/cottagecutzcirclesetbasics.aspx

http://www.scrappingcottage.com/cottagecutzstitchedcirclesetbasics.aspx


Saturday, October 15, 2016

SHAKER CARD IN NON TRADITIONAL CHRISTMAS COLOUR

HELLO !!!

It's Anita here !!! Have you started making your Christmas  cards ? The CottageCutz store has a wide range of Christmas and Fall theme dies and you can create simple and also heavy layered cards using these. You can check them out here:
Christmas 1, Christmas 2 and Fall Theme
Today I have a new card for you with Christmas theme but there is a twist in it. Its a shaker card and it's in non-traditional Christmas colour.
Do check it out here.


To make this card---

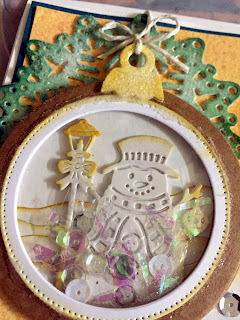
Cut out die cuts in white card stock from CottageCutz Stitched Circle die.
Cut out one from the largest die and this will form the base.
Stick together the largest and the smallest die with a 1/4 inch gap and cut out 6-7 circle frames.
Use the CottageCutz Snowman with lamp post to create a scene with a 3d effect. Layer two die cuts with 3D foam tape and distress the top one with scattered straw distress ink.


Adhere the frames in between each layer. I have used 4 frames . Add sequins and cover the top with OHP sheet cut to the same size as the circle. Put the final circle frame on top   and add another stitched frame. Place the whole thing on a brown Christmas Nested Ball Ornament. Add a string.


Apply distress ink Fossilized Amber, Rusty Hinge and Spiced marmalade on a craft mat, spray water and swipe a 7"/5" card stock to colour. Dry with a heat gun.


Cut two CottageCutz Snowflake doily and colour it with Evergreen Bough Distress ink. Apply clear adhesive and sprinkle Rangers Clear Rock Candy Glitter.


Create a circle label with CottageCutz Stitched circle die and add a sentiment.
Arrange all the elements as shown.


Matte on teal coloured card stock and finally adhere to a white card stock.
The finished card measures 7.5" by 5.5"


A challenge is up on the blog. the theme is Fall. We have an amazing collection of Autumn themed dies. So do share your entries. See you next week.


.


Wednesday, August 10, 2016

Snowman Christmas


Hello Scrapping Cottage friends! Thanks for taking the time to stop and visit today. It's Mary Marsh here bringing you the Wednesday edition of the Blog.

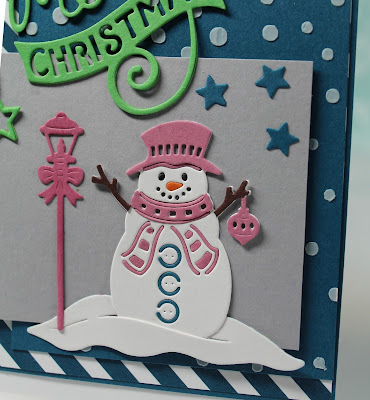
It has been so hot and humid in the Eastern U.S. so I thought I would create a card to cool you off (lol)! So today for your viewing pleasure, I am featuring a card using some of the new dies from the brand new CottageCutz Christmas 2016 release. I used the Snowman w/Lamp Post & Merry Christmas Ribbon dies.

All the new dies are available in the Scrapping Cottage Store right now and they are 25% off for a limited time. The design team will be featuring the new dies in our blog posts for inspiration. It's not too early to start thinking about your 2016 Christmas cards and design.

So without further ado let's get started with some details on what I have created here today.

White Card Base: 4 1/4" x 5 1/2"
Blue Striped Pattern Paper: 4 1/8" x 4 7/8"
Dark blue layer underneath: 4 1/4" x 5"
Blue Snowflake Layer: 3 1/4" x 4 3/8"
Image Panel: 2 3/4" x 3 1/2"
I like making Christmas cards with non-traditional colors. It helps to take me out of my comfort zone and stretch my creativity. I also like the look of using diagonal stripes on a Christmas card.

I started off with my layout this week. It's an older MojoMonday sketch. I have said before that I like working with sketches because it also helps to jump start my creativity. Especially when I have the dies in mind that I want to use. I like the challenge of getting my idea to fit into the confines of the sketch. I did take some liberties with this sketch and eliminated the small diagonal panel on the bottom right.
Once I had the all the card panel sizes figured out, I decided to use a stencil to create a snowflake background for my snowman. I did this with some 3-D molding paste to give the snowflakes a little dimension.
I use painters tape to secure the stencil. It holds the stencil in place well. When I am finished I just lift the tape on the right side only and remove the stencil.
 
I cut the snowman in white mixed media paper because my original idea was to watercolor and then I switched and decided to do some paper piecing and die in-laying. I liked how this little fellow turned out. I inlaid his buttons. eyes, nose and mouth.
 
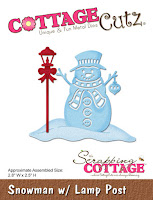
The lamp post is part of this new die set. I cut it to match his hat, scarf and little ornament. The snowbank is included as part of this set. It's just too cute. Don't you think?
In place of the 2 banners in this sketch I used the Merry Christmas Ribbon die.  I like the look of it in the corner. This is thick enough so you only need to cut one layer. I used ranger multi-matte medium to adhere it. Like this adhesive because it dries clear.
 
And that is my card for this week. Hope it gave you some inspiration.
 
Don't forget about our latest challenge -it's #5 and all about birthdays this month. Get the details here.
 
So until next time........inky hugs.
 
http://www.scrappingcottage.com/cottagecutzsnowmanwlamppost.aspx
http://www.scrappingcottage.com/cottagecutzmerrychristmasribbonelites.aspx