
It's Kris here to share some Monday inspiration with you! I've got an interactive card for someone under the weather or has had an injury -- it's sure to make them *SMILE* Featured on my card is Oh No Kitty, First Aid Kit, Ouch w/ Tooth, and the giraffe from Safari Adventure Gang!


**I got the idea for this particular interactive feature from a crafty gal I follow on IG: Srushti Patil (@srushtipatil on Instagram) and it was meant to be an interactive album page, but as you can see, I've used it as a fun element inside my card. I've changed up the measurements (to inches) to make it easier. I hope you'll give it a try!
DESIGN STEPS:
I started by cutting all my base card elements:
Grey cardstock: ---(Card Base) 8-1/2" x 5-1/2" scored at 4-1/4" ---(inside cover mechanism) 2-1/2" x 4-1/2" - scored at 1/2" and 1" on one end ---(pop out mechanism) 1-5/8" x 7-1/2" ---(pop out image panels, x2) 2-1/8" x 2-1/2" ---(left inside panel) 2-1/2" x 3-3/4" (not pictured below)
Pink/white patterned paper #1 (gingham): ---(front of card) 5-1/4" x 4" ---(inside cover mechanism) 1/4" x 2-1/4" ---(left inside panel) 2-1/4" x 3-1/2" (not pictured below)
Grey/white patterned paper: ---(inside layers x 2) 5-1/4" x 4"
Pink/white patterned paper #2: ---(pop out image panels) 1-7/8" x 2-1/4"
White cardstock: ---(inside cover mechanism) 2-1/4" x 3-1/4"


1. Adhere the pink gingham paper to the front of card and the grey/white patterned layers (2) to the inside of your card.
2. Adhere the white cardstock to the largest portion of the inside cover mechanism. Glue the narrow pink/white patterned strip between the 2 score lines of cover mechanism. (see photo below)
3. Adhere the 2 pink/white image panels to the 2 grey image panel mats. Set aside.

4. With the pop out mechanism (1-5/8" x 7-1/2") vertical in front of you, measure and mark w/ pencil at 3/8" and 1" across the top and bottom. Draw a line both lines vertically.
5. Turn mechanism so that the 3/8" tab is at the top horizontally, and measure and place a mark at 2-1/2" and 5" across top and bottom, draw lines vertically to connect as shown below.
6. Along the bottom line (at 1" line) measure and place a mark at 3-1/8" and 4-3/8" as shown below.

7. Using the photo below for reference, Draw diagonal lines from corner to those marks you just drew.

8. Cut away the 4 corner sections as shown in photo below by scribbles.

9. SCORE along the bold lines in photo below (the diagonal lines and 2 horizontal lines)

10. Push in on the diagonal score lines which will cause the mechanism to fold like this:

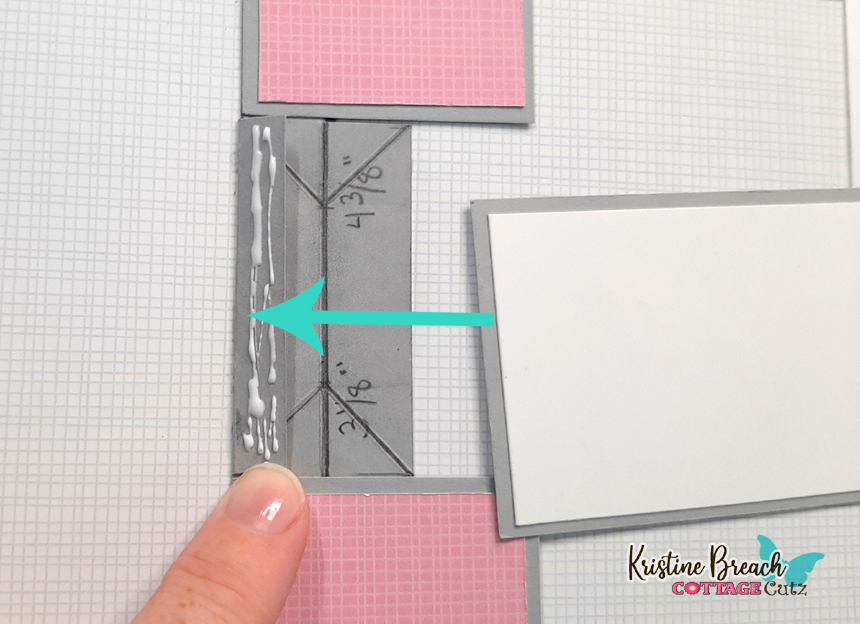
11. Open it back up. With the 3/8" tab at the top, apply glue to the outer arms as shown. Be sure NOT to add glue clear up to the diagonal line... try to stop with the edge of the tab.
12. With the image panels horizontal, line up the TOPS of them with the top edge of the glued arms.

13. Pull the 2 panels together so they overlap, and turn mechanism over and apply glue to the back section as shown. Turn it right side up and position it into the center fold of card.
**TIP: It helps to lift the left side of card to form a 90 degree angle so that you make sure not to go over the score line.

14. Add glue to the angled portion on top --- be sure not to get glue on the scored tab! Close the card and rub fingers over the mechanism to adhere.

15. Open card up flat and fold the 3/8" flap down. Apply glue to tab and attach the short edge of cover (not the tabbed end) so the edge lines up with the edge of tab.
16. Apply glue to the far right tab as shown and tuck it under to adhere.


Mechanism is done!! Time to decorate!!
Die cut the following:
Oh No Kitty from grey and white cardstock
First Aid Kit from white cardstock
Ouch! from Ouch w/ Tooth
Hugs w/ Shadow from both pink and white c.s.
the 2-3/4" Stitched Squares die from pink patterned paper
the 3-1/8" Nested Scalloped Square die from white c.s.
I colored the white die cuts with Distress Oxide inks and a blending brush.
I thought it'd be cute to take this giraffe's temperature with the thermometer from First Aid Kit. ☺

I hope you enjoyed this pictorial and will give it a try!
Have a CRAFT-tastic week!
~Kristine


