Monday, October 31, 2016

Feathers


Hi, Vladka is here!

Today, I have "just a note" card, where I used this cute little Feathers. And I also have a note for all of you. This is actually my last post here on CottageCutz blog. I loved to work with all these great dies and it was real honor for me to work for such a great company. But I need time for other things in my life now. It was not easy decision to make. I want to thank you all for all your comments and support through all these years. And of course I will continue to use CottageCutz dies and you are more than welcome to visit my blog and see what I will create with them in the future.

And now is time, to check my card.


Basics:

White card base: 4 1/4 x 6 inches (cut 4 1/4 x 12 inches, fold in half)
Additional piece of white cardstock and some white cardstock to cut out the die cuts. 

Other Supplies:

CottageCutz Dies: Listed Below
Distress Ink:  Brushed Corduroy and Wild Honey
Other: Scissors, Paper trimmer, Sizzix machine, acetate, acrylic block, gold spray

1. First, cut all three feathers out of white cardstock:


2. Apply Brushed Corduroy and Wild Honey distress ink on acrylic block or any other smooth surface, mixed it with little water and color the feathers. Use paint brush for coloring. Let it dry.


3. In this step use just Wild Honey distress ink and pressed feathers against the block  to pick some of the ink...


... so, you will get such splodges:


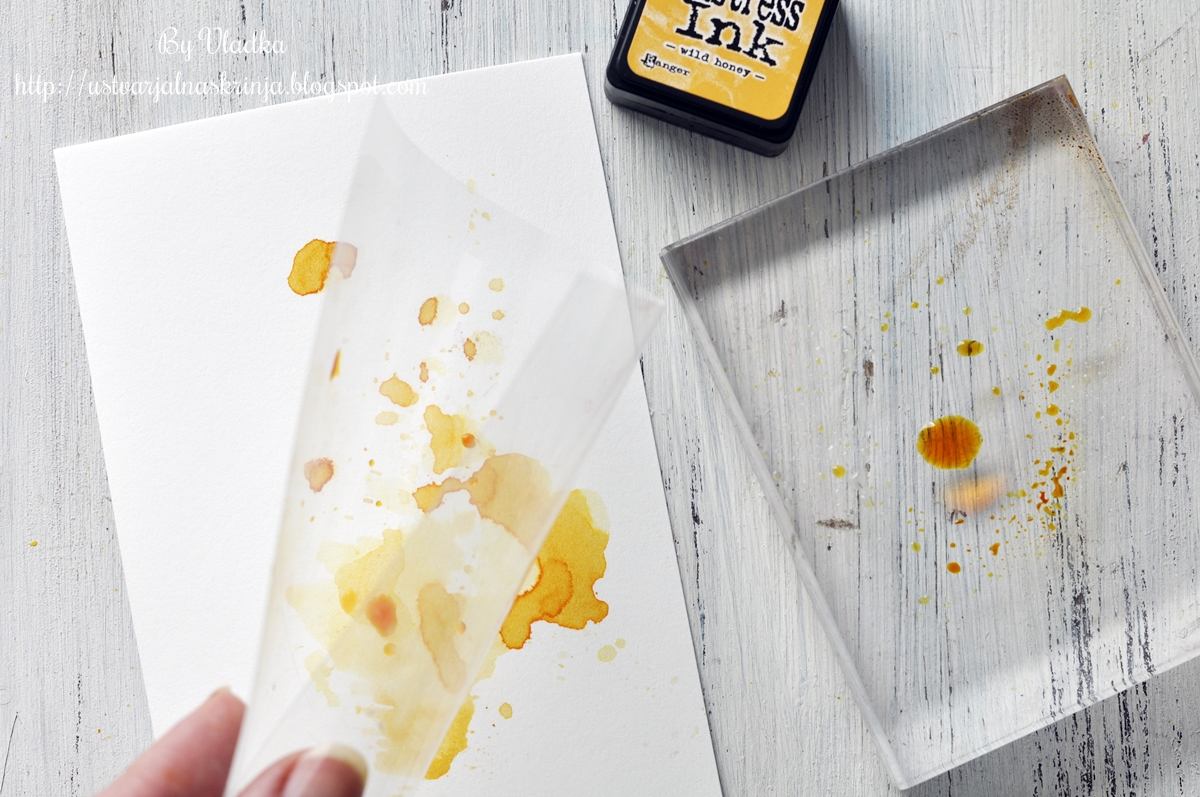
4. Now it is time for smooshing. Take a piece of plastic acetate and gentle pressed it against the block to pick up some of the ink. Now, press the plastic on the paper to transfer the ink. Put paper aside to dry or use heat gun to dry it:


5. Stamp "Just a little note" or any other sentiment on additional piece of paper and use third biggest rectangle from Cross-Stitched Rectangle Set. Put rectangle on the paper as seen on the photo and cut it out.


6. Now use second biggest rectangle die and put it on the rectangle which you cut out in previous step. Cut it out again to get little paper frame.


7. Now glue additional piece of paper on the card base diagonally as shown on the photo. Cut off the upper and left corner of paper to fit the card base.


8. Glue also little paper frame and all three feathers and flick some droplets of gold shimmer spray and let it dry. Card is now finished.


And here is the finished card again:


Have fun creating!

Sunday, October 30, 2016

Season's Greetings!

Hello everyone!

It's Donna here and CottageCutz has partnered with Peachy Keen Stamps to celebrate their new release of face stamps that work perfectly with the CottageCutz Christmas ornament dies. TWO NEW SIZES of Face Stamps have been added to their release, 1 5/8" and 1 7/8" to fit the super fun ornaments by CottageCutz.  Please stop over at Peachy Keen Stamps because Kathy is offering some promotional pricing on her new stamps sets that will go perfectly with the CottageCutz dies.

Ornament 1 1/8th" (smaller circle).  I am using the Cottagecutz Nested Ornaments:  Ball.


Here is how I put my card together:
  1.  The card is an A2 card 4 1/4 x 5 1/2,
  2. The red design paper is the same size as the base of the card, 
  3. The blue frame is die cut from the largest Cottagecutz "Stitched Wide Rectangle Frame Set",
  4. I die cut two of the Cottagecutz Nested Ornaments:  Ball (I used the medium and small sizes,


     5.  I used my Misti to line up the stamp on the circle,


     6.  Here is how it looks after I have stamped the face,


7.  I colored the snowmen faces with copics.  I used Y17, Y38 and YG68 on the snowmen's noses, B0000 on the eyes and R00 on the checks.  I used my white gel pen on the circle part of the eyes to make them stand out,
8.  I finished my card off by adding the sentiment by CottageCutz "Season's Greetings".

If you have not joined the challenge for this month, you have until Monday.   The theme is fall. Here is the link for more info.

Dies used:


Peachy Keen Stamps used:


Saturday, October 29, 2016

SHINING ORNAMENT CARD


Hello everyone,

 It's Anita here, with another inspiration project for you with CottageCutz dies. It is the festive time of the year and everyone is busy in the preparations for coming season. In India, we are celebrating the festival of lights -Diwali. It is that time of the year when gifts are exchanged and celebrations are in full swing. It is also important to thank everyone for everything. So today I have a thank you card for you in Christmas theme.
I have again used non traditional Christmas colours for this card.


The finished card measures 7.25 inches by 5.75 inches.
Cut a matte layer in white card stock measuring 7 inches by 5.5 inches.
Distress using Carved Pumpkin Distress ink and Ripe Persimmon.
Add some texture by using a stencil and the darker shade of distress ink. Randomly print design on the matte layer.
Using the CottageCutz Nested Star ornament die, cut out a space in the bottom right side. Stamp a sentiment on the card front.
Now adhere the Matte Layer on the card front using 3D tape.
Add  twine.
Cut out three die cuts from star die.
Add texture by using a stencil and Prima golden crackle paste.
Once it dries, cracks will appear.
Use them on the card as shown.


Do share your entries with us as you play along the challenge -7.
Do leave some good words on the blog as you stop by.

Friday, October 28, 2016

~From Our House to Yours~

Hello Scrapping Cottage friends! Thanks for taking the time to stop and visit today. It's Mary Marsh here bringing you the Friday edition of the Blog. Can you believe that October is almost a wrap?
The countdown to Christmas is starting. Yikes! I am behind on both Christmas and Thanksgiving cards. Hopefully, I can correct that some this weekend.
 
Today I am showing you a whimsical style card that would be very easy to mass produce. It's featuring the Nested Ornaments: Bulb and some Peachy Keen Face Stamps. 
 
Our design team partnered with Peachy Keen Stamps to celebrate their new release of face stamps that work perfectly with the CottageCutz Christmas ornament dies. Just a little way to bring some whimsy to your holiday crafting. Check out the site because Kathy is offering some promotional pricing on her new stamps + the CottageCutz dies.
 
Let's get started with my card and some details on what I did.
 
Red Card Base: 4 1/4" x 5 1/2"
White Embossed Layer: 4 1/8" x 5 3/8"
 
I decided to use this Cuttlebug winter themed embossing folder as the backdrop for my ornaments. Wanted to create some background interest.
 
My next step was to die cut my ornaments in red cardstock. I used the smallest ornament in the set.  The face stamps come in different sizes and for this ornament I used the 1 1/8" set. I made a guy and a girl ornament to coincide with the sentiment I used.

Before I assembled my card I stamped my sentiment. The "from our home to yours" is a one line stamp. I used my MISTI Tool to get the placement I wanted on 2 lines.
Using the MISTI I placed my Merry Christmas stamp on my background panel.
 
 
I lined up the "from our home to yours" stamp and masked off the part of the stamp I didn't want on the 2nd line of my greeting. 
 
2nd line of sentiment stamped
Repeated the same masking process and stamped my 3rd line of sentiment.
Now I am ready for the card assembly. I used some 1/8" striped red ribbon to "hang" my ornaments. Scattered some red sequins and my card is completed. I hope I gave you some additional inspiration for Christmas.
 
Also don't forget about our newest challenge going on right now. The theme is fall. Here is the link for more info.
Until next week..........inky hugs.
 
http://www.scrappingcottage.com/cottagecutznestedornamentsbulbbasics.aspx


Thursday, October 27, 2016

Poinsettia with Greenery


Hi, Vladka is here!

Today I have Christmas card with Poinsettia. It is easy to make it. So, it can be mass produced.


Basics:

Kaft card base: 4 1/4 x 6 inches (cut 4 1/4 x 12 inches, fold in half)
Additional piece of kaft cardstock and some red and white cardstock to cut out the die cuts. 

Other Supplies:

CottageCutz Dies: Listed Below
Distress Ink:  Peeled Paint,  Fired Brick, Aged Mahogany, Forest Moss
Other: Scissors, Paper trimmer, Sizzix machine, text stamp, white pigment ink


1. Use Holiday geenery die to cut the poinsettia petals out of red carstock and greenery out of white cardstock. Color greneery with green distres ink and if you want, distress the edges with darker shade of green distress ink. Distress also the edges of poinsettia petals.


2. Glue all pieces together as shown on the photo:


3. Now prepare white strip. Use Cross-Stitched Rectangle Set and cut the second biggest rectangle out of white paper. In second step use the same die one more time put it on the white rectangle as shown on the photo and cut it out again. Now, the strip is a little bit more narrow.


4. Time to cut out "Merry Christmas" and cardbase with additional piece of paper.


5. With text stamp and white pigment ink, stamp the text on additional piece of paper. Distress the edges with the same white ink.


6. Now glue all pieces together as shown on the photo and card is finished:


This is is for today. Have a nice day. And don't forget, seventh CottageCutz challenge is waiting for you. This time theme is FALL. You can linked your project here. And please, use only Scrapping Cottage dies.