Sunday, July 31, 2016

The Card for Newborn Baby+ VIDEO tutorial

Hi, Yuliya here!
Welcome to my new post where I will show you how to make this pretty card with the CottageCutz dies.

Here is list of all supplies I used
CottageCutz Dies:
- CottageCutz Tea Time Doily (4x4)- CottageCutz Butterfly Tag
- CottageCutz Plumeria & Leaves (4x4)
- CottageCutz Expressions Hello
- CottageCutz Garden Accessories
Other: Sizzix machine, glue, patterned paper, cardstock,scissors
Follow me!)
             

I would like to remind you on our challenge #4 - greenery
You still have time to share your projects with us.
I hope you have been inspired by my card today.


Saturday, July 30, 2016

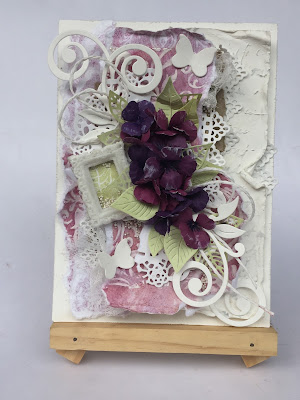
Shabby Chic Card with Anita Kejriwal

Hello dear friends,

This is Anita here and I hope you are all set to have a wonderful time crafting with me. Today, I am going to share a shabby chic card with you. I have made this card using various CottageCutz dies , the details of which you can find below.
Here is also a video tutorial on making 3D flowers and arranging them on the card.

Here is my card.


To prepare the base of the card, follow these instructions.

1. Cut a white card stock measuring 7.5 inches x 5 inches.
Score at 0.5 inch on the 7.5 inch side and fold. Cut another piece 7 inches x 5 inches and adhere to the folded card.
2.Cut a mat layer out of white card stock measuring 6.75 inches x 4.75 inches and curl the edges. Add texture using modelling paste and script stencil.
3. Cut a pattern paper a little smaller than the second mat layer. Add texture using stencil and modelling paste. Let it dry. Tear in several layers as shown and combine with the CottageCutz dies and add to the card. 


After finishing the base, make the flowers and arrange it on the card. Follow the video tutorial here.


List of dies used


So I hope you liked my card and the tutorial. Please do leave your feedback. We are also having a contest at our blog. So do share your entries here

See you next week.


Friday, July 29, 2016

We've Moved

Hi, Vladka here!

Also on today's card I'm using dies from Home sweet home release and also some dies from previous releases. I saw ideas for such a card on the Pinterest and decided to give it a try. So, I used Build a House set 2 die and cut out just upper part of the house to create little houses. Balloons are taking the middle one away to another place. Let me show you how I created this card.


Basics:

White card base: 4 1/4 x 6 inches (cut 4 1/4 x 12 inches, fold in half)
Additional piece of white cardstock and some white cardstock to cut out the die cuts 

Other Supplies:

CottageCutz Dies: Listed Below
Distress Ink: Fired Brick, Fossilized Amber, Twisted Citron, Mermaid Lagon, Dusty Concord, Aged Mahogany, Tumbled Glass
Other: Scissors, Paper trimmer, Sizzix machine, Scor-buddy, Water, Sheet of Acetate

1. First let's do some smooshing on additional piece of paper to prepare the background.  Add some Tumbled Glass Ink on acrylic block and spritzed some water on it. Then take a piece of plastic acetate and gentle pressed it against the block to pick up some of the ink. Now, press the plastic on the paper to transfer the ink. This will give you a splotchy look. Do the same with green distress ink on the bottom of the paper. This will look like the lawn.


2. Cut the Balloons out of white cardstock and color them with differnet distress inks and use blending tool for that. Distress the edges with darker distress inks. 


3. With Build a House set 2 die cut 3 little houses out of white cardstock. Leave the first two white and glue the roof and the window on both of them. On the third one use the smallest heart from the heart set dies and cut the heart out of the house. Colore the heart red and put it back where it was cut out before. Color also the roof and glue it on the house. 


4. Now it is time to glue everything together. But first cut the expression "We've Moved" out of the white cardstock. Now put all the pieces together as shown on the photo. Use aslo 3D foam adhesive squares to glue some balloons and the house with the heart.


I hope you like this card. Enjoy the summer and have fun creating. And don't forget, fourth CottageCutz challenge is waiting for you. This time theme is GREENERY. You can linked your project here. And please, use only Scrapping Cottage dies.

Thursday, July 28, 2016

Pop-up card Once upon a Springtime

Hello Scrapping Cottage friends!
Yuliya here! Welcome to my new post where I will show you how to make this pop-up card  with the June's release of theCottageCutz dies - Home Sweet Home.


Here is list of all supplies I used:
CottageCutz Dies:
Other: Sizzix machine, glue, patterned paper, cardstock,scissors, distress ink "vintage photo"
Follow me!)
1. Size my patterned paper - 28 cm*14 cm. Fold it as it is shown on the picture.
2.From a white cardstock cut out rectangle. I use CottageCutz Build-A-House Set 1 (Includes 2 Dies)
3.
4.
5.

6. Prepare some die-cuts. I use CottageCutz Build-A-House Set 1 (Includes 2 Dies)CottageCutz Garden Accessories
7.
8.
9. Prepare  patterned paper for base. Size 30 cm*15 cm
10.
Assemble the card


I would like to remind you on our challenge #4 - greenery
You still have time to share your projects with us.
I hope you have been inspired by my card today.

Wednesday, July 27, 2016

Christmas In July + Sale

Hello Scrapping Cottage friends! Thanks for taking the time to stop and visit today. It's Mary Marsh here bringing you the Wednesday edition of the Blog. I am back from our beach vacation all tanned and relaxed. Last week I showed you a beach card and this week I have gone with Christmas, my favorite time of the year. 

Today for your viewing pleasure, I am featuring the Santa's List die that is part of the Christmas In July sale going on over at the Scrapping Cottage Store. The sale ends tonight at 9:00 pm Pacific time and there are some great deals to be had. You can save between 50%-80% on some Christmas dies.
 
Now lets get started with the details on my card.
 Card Base:  4 1/4" x 5 1/2"
Striped Paper: 4 1/8" x 2 3/4"
Vanilla embossed panel: 4 1/8" x 3"
 
My thought process on this card is to show Santa in a room checking out his naughty or nice list. I decided to create my wall background with some striped patterned paper for the wallpaper and a vanilla dry embossed layer to represent wood beadboard. The scalloped panel is the chair rail. And, that was part of an old Christmas scrapbook kit.
 
I found this striped patterned paper in my stash and thought it might be good colors for Santa's room. I used a vertical striped embossing folder on the vanilla cardstock.
 
 
After I die cut the Santa silhouette in black, I decided to make a night sky for the window. I sponged 3 shades of blue distress inks and then made a stencil to add some stars to the night time sky. I sponged those in a silver ink. I cut the sponged panel down to the size of the window and used glue to attach.
 
 
I wanted Santa's gifts to stand out so I die cut them in red card stock. A few little snips to separate them from Santa's stool and they are ready to be paper pieced over the black. I also paper pieced the moon with some silver cardstock. I attached them with Tombow mono adhesive and ranger multi-matte medium.
 
I attached the entire image to the background panel using 3D foam squares to give it dimension. My olive green carpet is actually a sneak peak of a new snow bank die coming soon.
 
 
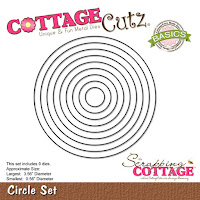
To complete my card, I stamped my "naughty or nice" sentiment on vanilla cardstock and cut with the 3rd largest stitched circle die. Layered that onto a red circle cut with the 4th largest circle die.  
 
And that is my card for this week. Hope it gave you some inspiration. Let me know your thoughts, I read all of the comments you leave. Also, don't forget about our current challenge. It's all about greenery and you can get more info here. Until next time........inky hugs.
 
 
http://www.scrappingcottage.com/cottagecutzsantaslistelites.aspx
http://www.scrappingcottage.com/cottagecutzcirclesetbasics.aspx

http://www.scrappingcottage.com/cottagecutzstitchedcirclesetbasics.aspx