Monday, April 24, 2017

Baby Boy Pop-Up Box Card

Hi, Lois here with another baby card, using some of the new baby dies.   Last week my card on the blog was for a baby girl.  Today's card is for a baby boy.  Pop-Up Box cards are so much fun to create.


Supplies used on my card are:

White cardstock cut 12" x 8 1/2"
Blue cardstock cut as follows:
     3 panels cut 2 1/2" x 3 1/2"
     6 panels cut 2 1/2" x 2 1/2"
     2 panels cut 2 1/2" x 6 1/4"
Patterned paper panels cut 1/8" smaller than blue panels
White cardstock panel cut 1/8" smaller than the long blue panel
White, blue, tan cardstock for die-cuts
Acetate
Copic markers
Scor-Tape
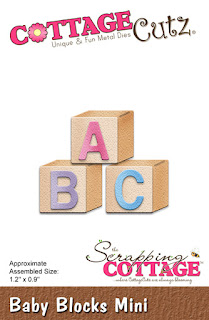
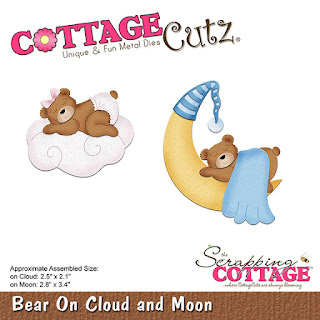
CottageCutz dies - Bathtub Time, Baby Boy Tag Topper, Baby Blocks mini, Bear on Cloud and Moon

To make the card, score the 12" x 8 1/2" piece of white cardstock on the long side at 2 3/4", 5 1/2", 8 1/4", and 11". 


Then cut off a 2" x 12" strip and set aside to use later.

Rotate the white cardstock a quarter turn and score at 2 3/4".


Cut down 2 3/4" to the score line along each of the perpendicular score lines.  At the 11" score line, continue to cut at an angle to create a tab, as shown in the photo.


Cut the 2" x 12" strip at 4 3/4" from the end with the 1" score line, and then cut in half to create two 1" x 4 3/4" strips.  Add some Scor-Tape to the ends, as shown.


Cut the blue and white cardstock and patterned paper pieces, as shown.


Adhere to the white card base.

  Outside of box

   Inside of box

Add Scor-Tape to the small tab, fold the card together and adhere the tab.


Adhere the two small strips of cardstock to the inside of the box, with the tabs facing toward the outside.


Cut the die-cuts using all four dies, using white, blue, and tan cardstock.


Color the die-cut pieces and assemble. 


You can see that I assembled the tub scene on a piece of acetate.  I did this so that I could show the water droplets and bubbles.


Add all the assembled pieces to various parts of the box, using acetate strips to elevate the blocks.


If you've never made a pop-up box card, I would encourage you to give it a try.  It was great fun!

CottageCutz dies used on my card are:


http://www.scrappingcottage.com/cottagecutzbathtubtime.aspx


http://www.scrappingcottage.com/cottagecutzbabyboytagtopper.aspx


http://www.scrappingcottage.com/cottagecutzbabyblocksmini.aspx

http://www.scrappingcottage.com/cottagecutzbearoncloudandmoon.aspx

Sunday, April 23, 2017

Sleeping Bear

Hi!

It's Sunday again and it's time for my new post. The new Baby collection in available in the store and I just love it. For my first baby card I chose this cute bear on the moon.


 I used:
- Cottage Cutz dies (Bear on Cloud and Moon),
- white card base (14,5 x 14,5 cm),
- light blue paper (13,5 x 13,5 cm),
- white watercolor paper (13 x 13 cm),
- Distress inks (Black Soot, Faded Jeans, Chipped Sapphire, Stormy Sky, Broken China, Mustard Seed, Wild Honey, Vintage photo, Brushed Corduroy),
- blue felt,
- blue small pom pom,
- white embossing powder,
- little star stamp,
- Versamark embossing ink pad,
- white and gold acrylic paint,
- water,
- brush,
- white and black pen,
- paper glue and foam glue pads.


First I made the starry background. I stamped a bunch of little stars on the watercolor paper using Versamark embossing ink.


I embossed it with white embossing powder and colored the background with Distress Inks (Broken China, Faded Jeans, Stormy Sky, Black Soot and Chipped Sapphire).


I dropped some water around the stars and dried it with the heat gun.


I splashed some drops of white acrylic paint around the stars to make it look like a galaxy.


Then I die cut all the pieces for the bear from white card stock and colored it with Distress inks. The blanket is cut from blue felt. 


The moon is also colored with Distress Inks and sprayed with some water. I emphasized the surface with white brush pen and splashes of gold acrylic paint.


I glued all the pieces of paper together and adhered the moon with foam glue pads to give it a little height.


That is all from me today. Have a nice Sunday.

Anja Ž.

Cottage Cutz die I used:


Saturday, April 22, 2017

Sending Hugs from Noah's Ark

Hello Scrapping Cottage friends! Thanks for taking the time to stop and visit today. It's Mary Marsh here bringing you the Saturday edition of the Blog.

We just had the cutest release of baby dies. There are 42 different designs. So perfect for creating cards to welcome the new baby, baby birthday cards or even as baby shower invitations. I have several nieces who just got married and now are expecting so I will need baby cards soon. Just not right now and that may be where you are at.

So today for your viewing pleasure, I am showcasing the new Noah's Ark die. But, I am showing another way to use this die that isn't centered around a baby card. I featured this card on Tuesday using the choo choo train dies with the same idea. 

I needed a card of encouragement to send from a group of us. I thought all the ark animals would be perfect for a card of this type. So let's get started with some details on how I created this card.

Gray Card Base: 5 1/2" x 4 1/4"
Blue Layer Panel: 5 3/8" x 4 1/8"
Patterned Paper Image Panel: 5 1/4" x 4"

Step 1: This week I created my card design totally around my patterned paper. I found this awesome scenic water and sky patterned paper in my stash. I thought it would be a great accompaniment to the ark. I really like using patterned paper on my cards. So when the card design, dies and paper fit like a glove it's a win-win for me.
Step 2: I cut all the animals and the ark using different color cardstock. The colored picture on the die packaging is always the perfect colors-in my opinion. So I usually use colored cardstock that matches the picture.
Step 3: I assembled the ark and placed all the animals in their assigned spot. Normally, I would do this right on the patterned paper but I only had 1 sheet of this paper and I didn't want to make a mistake or get glue somewhere it shouldn't be. You know how easily that can happen (lol)!!
Step 4: I stamped my sentiment on this step. I used 2 different stamps and my MISTI for placement. I forgot to take a photo of this part of the process. Started assembling all the layers. I changed the base color to a light gray instead of the white I was going to use. I thought the gray accented the blue panel and the patterned paper more than the white.
 
Well, Blogger friends that's it for me for this week. I hope I have given you another idea on how to use these new dies. See you all next Saturday!!!
 
Die I used to create card:
http://www.scrappingcottage.com/cottagecutznoahsark.aspx

Friday, April 21, 2017

WELCOME BABY CARDS

Hello Friends !!!

Welcome to the CottageCutz blog. It's Anita here with new Baby theme dies released by CottageCutz.
CottageCutz has released a whole new range of baby theme dies that are so cute. You would all of them. Check them out here

For today's card, I have these beautiful baby dress die featured on a baby girl card and a diaper pin on the baby boy card.


To make these cards, do follow these steps.

Cut a white card stock 5.5" x 4.25" and emboss in the die cutting machine using a baby theme embossing folder.
Adhere this embossed panel on a blue and a pink mat layer that is 1/8 inch bigger than the embossed panel.
Finally adhere this panel on a white card stock which is again bigger than the previous panel.
Now, add ribbon at the base.
Add pink ribbon for baby girl.
For baby boy, Add a strip of vellum on the baby boy ribbon and adhere to base of the card.
Cut the diaper pin and baby dress in white card stock. 
Colour them with copic markers.
the girl's dress is done with Copic R30 and R0000.
The pin is coloured with B01 and B00, C3
Adhere the pieces of diecuts together. Add a little glitter from the Wink of Stella pen.
Cut out the doilies die cut from Sweet Doilies die in white pink and blue.
Cut a piece of stitched circle in pink card stock for baby girl card.
Arrange and adhere the die cuts as shown,
Finish with a welcome baby sentiment.


CottageCutz dies used.


I hope you like my cards. See you again next Friday with more cute projects.

Thursday, April 20, 2017

Welcome Baby!


Good Morning Dear Scrapping Cottage Friends!

I am happy to show you another one of the new baby dies that was just released.  I have had two great nephews born in the last 6 months and they came down to visit from Ohio.  They were both just so adorable.  So needless to say I am in the baby mood!  Today I am showing you a card using Sweet Baby Lamb.


Here are my design steps for this sweet baby card!

1.  Use an A2 white card base cut a piece of cloud designer paper using the second largest Pierced Rectangle die then glue to the center of the card front
2.  Cut a white fence using the Victorian Fence die, cut green grass using the Spring Grass die and cut a pink frame using the Pierced Wide Rectangle Frame Set.  Glue the fence and the grass to the bottom of the sky.  Then add dimension tape to the frame and mount it

3.  Cut and assemble all the little critters and accessories from the Sweet Baby Lamb die set


4.  Use the second to the smallest Cross Stitch Circle dies and cut a white circle.  Stamp the sentiment and add a button with some pink and white bakers twine


Here are the Cottage Cutz Products I used to create this card!


These new baby dies are so sweet!  I hope you will make a new mom very happy by making her a card to celebrate having her new little one!

Blessings
Pam