Showing posts with label Z-Fold Card. Show all posts

Wednesday, February 22, 2023

Double Z-Fold Farm Scene

Welcome CottageCutz friends!

Kris here with some Wednesday inspiration for you!  In honor of our HUGE President's Day Sale going on right now, I've created a fun Double Z-Fold card using lots of dies that you can find on sale - up to 83% OFF! Shop early for best assortment - sale ends this Friday 24th!


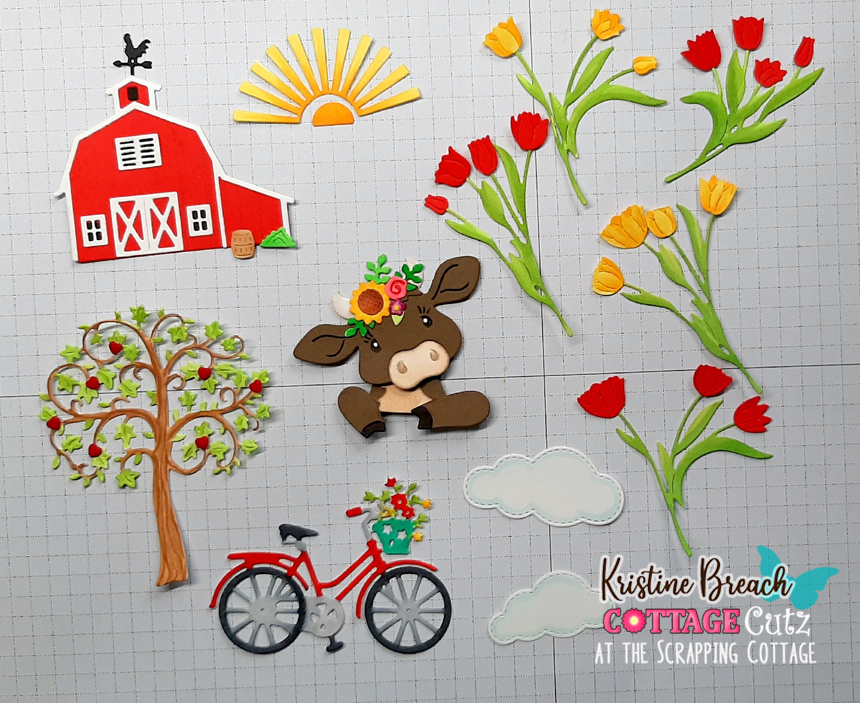
This card was so much fun to make!!  We've lived right next door to an upscale ranch for 26 years, and have been lucky that they only keep the baby calves and their mamas in the field that borders our fence.  They're so cute when they frolic and play.  So I just HAD to buy a few cow dies. 

DESIGN STEPS:

1.  I cut a piece of light blue cardstock 4-1/4" x 11" - then scored at 5-1/2" and 2-3/4" (card base).

2.  I cut  a piece of lime green cardstock to 4-1/4 x 11" - then scored at 5-1/2" and 2-3/4" (grass).


3. I cut the lime green panel into (2) pieces of 2-1/4 x 11.  One of the panels I cut off the 2-3/4" end to make it a 2-1/4" x 8-1/4" piece.

4.  I die cut the tops of both green pieces with the Grass Slimline die - 83% OFF!!  ***BE SURE you are cutting the correct edge --- the longer green piece will have the 5-1/2" section on the left and the shorter piece will have the 5-1/2" section on the right!  


5.  I glued the shorter lime green piece to blue card base, clear to the right and aligned with bottom edge.  (You may find it easiest to attach just the part before the score line, then fold your card onto the short scored part so your card will fold flat to fit into an envelope.)  

6.  I glued the longer lime green piece to the front ***ONLY glue 1/2 of the longest scored section... and then the shortest outside edge section as pictured below.

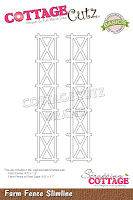
7.  I die cut the Farm Fence Slimline - 83% OFF!!  and scored it at 2-3/4" and 5-1/2" and glued it to the front grass piece as pictured.


8.  Next, I die cut all my design pieces and inked 'em up, and assembled!  

Just LOOK at all these SAVINGS!!  


9.  Glued everything in place and done!  ☺☺☺ How cute is this?


This card folds up to fit into an A2 envelope ☺


PRODUCTS I USED:


I hope you're inspired to see what you can create with your favorite CottageCutz dies!!

~Kristine

Wednesday, May 10, 2017

CottageCutz Baby Lamb on Moom

Hello and welcome to the Scrapping Cottage Blog!  I am Beverly Polen from Guneaux Designs, and today I am a guest designer.  I have for you a darling card that features the CottageCutz Baby Lamb on Moon Die.  I think the baby lamb is so adorable!


The card design is a Z-Fold with ovals cut out from the first and second sections.  You can see through the ovals to the main element on the back section of the card, which is the CottageCutz Baby Lamb on the Moon.  I have not seen before a Z-Fold card with the first two sections cut out for windows to see through to the main image on the back section.  If there is no such design in the crafting world, I guess I just created a new Z-Fold card design.   LOL!

To create my Z-Fold card, I cut from white card stock the pieces from the lovely CottageCutz Baby Lamb on Moon Die.  


I colored the pieces with Copic Sketch Markers, adding a touch of gray to the moon.  Afterwards, I glued the pieces together.


Using the second and third to the largest CottageCutz Double-Stitched Oval Dies, I cut out an oval and frame from white card stock.  I later colored the frame with a yellow copic marker.  I also cut a second frame with the largest and second to the largest dies and colored it yellow. 


I colored the oval with two of the new Tim Holtz Oxide Ink Pads (i.e., faded jeans and broken china). I used the lighter blue for the center of the oval for the moon's glow.


Then, I cut a 10-13/16" x 5-1/2" piece of white card stock and, on the 10-13/16" side, scored at the 3-5/8" and 7-1/4" measurements.  The 3-5/8" score line is a mountain fold and the 7-1/4" score line is a valley fold.  At this point, I did not fold the card stock on the score lines until I finished additional steps.  


I wanted to create the appearance of a galaxy; therefore, I sponged onto the card stock three of the Tim Holtz Oxide Inks (i.e., fossilized amber, faded jeans, and broken china) and spritzed it lightly with water.  After drying, I used a toothbrush and diluted white acrylic paint to splatter paint onto the colored card stock.


After that dried, I turned the card stock over and colored the center section with the same inks, spritzed with water, and splattered with acrylic paint.  When the card is finished, this section will be the inside center fold.


Before folding on the score lines, I placed the second largest Double-Stitched Oval Die on the first section of the card, and the third largest die on the center section, centering them as much as possible. I ran the card stock and dies through my die cutting machine.


I then folded the card on the score lines, and the following photo shows the result.


Next, I assembled the card by attaching the baby lamb and moon onto the oval previously colored and adhered it to the last section of the card.  I used an old star stamp to stamp, emboss, fussy cut, and add to this piece.


Then I added the largest yellow frame to the first section of the card and the smaller frame to the inside center section. 


When the card is closed, the back middle section that was inked will show as the second section on the card.


I did not add other embellishments to the card as I did not want to distract from the "galaxy" effect on the card.  A sentiment will be added when I know who is the recipient.

I hope you enjoy this card and take time to browse the recently released baby and script design dies! The script dies are 25% off for a limited time!  Have a blessed day!

I used these two CottageCutz dies for the card: