Showing posts with label Victorian Fence. Show all posts

Thursday, June 03, 2021

Best of Cluck!

Hello Scrapping Cottage Friends 

It is Pam creating with you today!

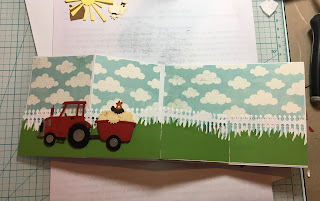
IT IS NEW RELEASE TIME! The collection is called COUNTRY FARM! It has the most delightful dies.  Everything from Tractors to Cowboy Chicks!  Each die is just full of awesome details and can be used for so many different occasions.  Today, I am using the Farm Tractor w/Trailer as a best of luck z-fold card.


Design Steps:

1.  Using the Tractor w/Trailer die cut all the pieces.  I used red, black, silver, brown and acetate for the window and head light.  I also used the Stacked Farm Animals for the additional chickens.  And the Grass, Tree and Vine die for the background tree.  Shade and assemble all pieces
2.  For the base of the z-fold card I used a white piece of card stock 4 x 11.  Fold it in half and then fold the front fold in half again.  For the little z-fold white strip I cut a 1 x 11 inch strip.  This strip is scored at 2 3/4 x 5 1/2.  

3.  Before attaching the strip glue down your cloud DP 2 panels at 2 5/8 x 3 7/8 and 1 panel at 5 3/8 x 3 7/8.  Next use your Grass Slimline die and cut 2 pieces of green grass about 1 inch high.  Also cut 4 pieces of white fence using the Victorian Fence die.  Glue the fence to the back of the grass and then glue to the z-fold strip.  Using the Stitched Sun, Cloud and Umbrella die cut out a sun in yellow
4.  Pop up the Tractor and Trailer to the card as shown.  Add the sun to the upper left corner
5.  Glue the tree flat to the back panel as shown.  Glue the 2 additional chickens and bags of grain to the card as shown.  Add the sentiment and your card is finished

CottageCutz Products


Thank you all for stopping by and be sure to check out this adorable new release!

Take Care and Blessings
Pam


Thursday, May 06, 2021

Birthday Garden

 Hello Scrapping Cottage Friends

It is Pam creating with you on the blog today!

I am using one of our new slimline dies today and a variety of dies from our Springtime Release.  I have a number of birthdays coming up in the spring and summer months so I am getting a head start.


Design Steps:
1.  Begin by using a blue slimline card base and set aside.  Use the second from the largest Slimline Stitched Rectangle die and cut out 2 (one for the inside) using white card stock.  On the white rectangle for the front of the card use a blue ink and blender brush add some sky in the three spots as shown above
2.  Use the Victorian Fence die and cut out 3 pieces of fence on kraft card stock.  Using the Spring Grass die cut out 3 pieces of grass on green card stock.  Trim down the grass and fence then glue the grass to the bottom front of the fence.  Glue the fence bottom only to the card front in the area where you inked.  The reason you only glue down the bottom is so you can tuck in the flowers behind the fence
3.  Use the Spring Flower PotBunny Gnome 1Cat w/Spring Bird, Spring Bloom CottageBird w/ Bluebells, Mouse w/Flower Cart for all of your garden pieces.  I used 2 shades of green, purple, yellow, pink, tan, gray, black and vellum


4.  Assemble your flowers, watering can, birds, and bees.  Glue the flowers behind the fence as shown.  After your flowers are tucked in glue the top part of the fence down.  Pop up the watering can, bunny and bird as shown.  Glue the bees in place as shown,  add little pearls to the inside of your flower then stamp and add your sentiment. Your card is complete

CottageCutz Products


I got a lot of use out of the Spring Release collection with different pieces from a variety of dies.  And I just love how it turned out.

Blessing and Take Care

Pam


Tuesday, March 14, 2017

Notepad with Chloe

Hi, Janja here!

Small notepads are always useful for writing or drawing. They can also be a nice gift.
I prepared one today and decorated it with lovely bear Chloe.


Supplies:
- CottageCutz stamp & die sets: Chloe with Kitty, Garden Gnomes 2 (butterfly and flowers), Victorian Fence, Square set, Stitched Square set
- white cardstock (2x): 5.3 x 5.1" (13,5 x 13 cm)
- patterned paper: 4.9 x 4.9" (12,5 x 12,5 cm)
- white cardstock: 4.7 x 4.7" (12 x 12 cm)
- white blank sheets: 5.1 x 5.1" (13 x 13 cm)
- Distress ink: Worn Lipstick, Mustard Seed, Tumbled Glass, Twisted Citron, Antique Linen, Vintage Photo
- watercolor brushes
- clouds mask
- stencil brushes

Stamp Chloe with black Archival ink on watercolor paper, and color her.


Cut out all the elements with dies.


Fasten masking tape on white front page, and shadow background.


Trim white and patterned paper. Cut out square in the middle of both with a dies. Use the largest dies from both sets.


Cut off the lower corners on both cardstock and frame with a corner puncher. Glue both frames to each other.


Fasten frame to the front page and decorate it partially.


Bind the sheets with a spiral, and complete the front page of notepad.


Thank you for joining me today. See you again at next Tuesday.