Showing posts with label CottageCutz Tea Time Doily. Show all posts

Thursday, November 30, 2017

Sweet Get Well Bear!


Good Morning Scrapping Cottage Friends!

It is Pam creating with you today!!

A HUGE SALE IS GOING ON NOW!!! THIS SALE FEATURES OUR LATEST RELEASE DIES FOR THE ULTIMATE GET WELL CARD! HERE IS A PEEK of all the new release dies! Also make sure you check out our entire store there are many items on sale!! HERE IS THE LINK TO THE STORE!

Now on to todays card!

I am continuing to share our new release Get Well Dies.  They are just so perfect to cheer someone up who is not feeling well.  And we all know that this is the time of year for the nasty colds and flu.  As a matter of fact I think I will send this to myself because I have my first cold of the year!

Design Steps:

1.  Using the Bear Patient die cut the bear out of kraft card.  Then cut the soup can and tissue box out of white
 2.  Using TH Distress Oxides shade in the bear and add the rhinestones for his eyes
3.  Using Copic markers color in the soup can and the tissue box and assembly all of the pieces
 4. Using the Tea Time Doily die cut out a white doily.  Use the Expressions Get Well Phrase die cut get well out of red card stock

 5.  Us an A2 white card base cut a slightly smaller piece of red card stock and then a slightly smaller piece of DP and glue them all together
 6.  Glue the white doily to the top of the card
 7.  Pop dot the bear with the soup can and the tissue to the doily

8.  Glue the Get will to the bottom half of the card and your Get Well card is complete

Cottage Cutz Dies


I hope you will check out our massive sale and take a look at the new release Get Well Dies.  They are all so cute and perfect for a great Christmas Gift!
Blessings


Pam

Saturday, July 30, 2016

Shabby Chic Card with Anita Kejriwal

Hello dear friends,

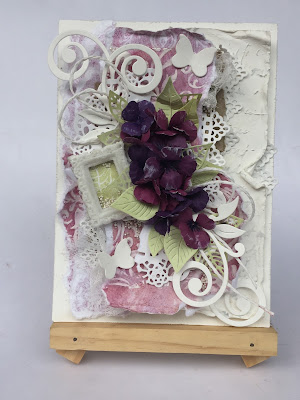
This is Anita here and I hope you are all set to have a wonderful time crafting with me. Today, I am going to share a shabby chic card with you. I have made this card using various CottageCutz dies , the details of which you can find below.
Here is also a video tutorial on making 3D flowers and arranging them on the card.

Here is my card.


To prepare the base of the card, follow these instructions.

1. Cut a white card stock measuring 7.5 inches x 5 inches.
Score at 0.5 inch on the 7.5 inch side and fold. Cut another piece 7 inches x 5 inches and adhere to the folded card.
2.Cut a mat layer out of white card stock measuring 6.75 inches x 4.75 inches and curl the edges. Add texture using modelling paste and script stencil.
3. Cut a pattern paper a little smaller than the second mat layer. Add texture using stencil and modelling paste. Let it dry. Tear in several layers as shown and combine with the CottageCutz dies and add to the card. 


After finishing the base, make the flowers and arrange it on the card. Follow the video tutorial here.


List of dies used


So I hope you liked my card and the tutorial. Please do leave your feedback. We are also having a contest at our blog. So do share your entries here

See you next week.


Saturday, May 14, 2016

MIXED MEDIA WITH COTTAGECUTZ

HELLO !!!!

Its Saturday again and time for my new post !!!! I hope you will like this post as much as I enjoyed writing it.
Have you always thought that die cuts are usually for card making or scrapbooking. But after this post , you will change your opinion, for today I have for you-A Mixed Media Canvas with CottaageCutz dies. YES!!! you got me right !!!
CottageCutz has some most amazing dies that can used in mixed media to create beautiful backgrounds.
I have made a video tutorial on the making of my mixed media canvas. Do go through it to get detailed description of the project.
Here is the video tutorial.


Photographs of the project


CottageCutz dies used


Other products used

An 8x8 inch wooden board, Modelling paste , white gesso, White sand Texture Paste, Distress inks, Distress Sprays, Stamps, Black Ink, Glossy Accents, Distress Glitter, Stencils, Multi Medium Gel


I hope you liked  the project. We are having a brand new Challenge at the CottageCutz blog and the theme is Hello Spring. So do take part in it to win fabulous prizes.

Keep crafting and thanks for stopping by.


Saturday, April 30, 2016

DAINTY DAISIES WITH ANITA KEJRIWAL

Hello friends,

Its Saturday time and I am here with another bouquet of flowers for you using CottageCutz dies. CottageCutz has some most amazing flower dies and I simply love their 3D flower dies. In my previous posts , I have shown many ways as to how to use these dies beautiful. Today, I am here with one of my most favourite flowers--DAISY.
The CottageCutz 3D flower #3 die can give you most beautiful daisy flowers and they are so simple to make.
Here I have a very simple card that highlights the beauty of these flowers. Please follow the step by step pictures on making of the flowers.


Here is the step by step instruction for creating the flower

 Cut out die cuts from white card stock with the CottageCutz 3D flower #3 

       Colour the centre of each flower using the Archival Pink Peony ink

        Shape the flower by placing a stylus in the centre of each petal and by  pinching.


        Layer the flowers together-four layers in one flowers and cup deeply in the middle to make the  flowers stand upright. Add pollens in the centre.


            Cut out leaves from CottageCutz Leafy Foliage die and colour Archival leaf green ink


Cut a card base measuring 8.25 inches by 4 inches. Cut a mat layer 8 inches by 3.75 inches and adhere to the card front. Cut a pattern paper 7.75 inches by 3.5 inches and distress the edges. Add texture using modelling paste and stencil.


Arrange the flowers, leaves and CottageCutz tea time doily as shown. Add sequins to the card.


The Anything Goes Challenge is still going on and you just have few hours to join in. Do send in your entries for amazing prizes.
See you next week. Please do leave a few words and thanks for your time.


Monday, April 18, 2016

Magic-box for the Newborn Girl

Hello friends!
Yuliya here and today I share with you another project made with the CottageCutz dies. I make  magic-box for the Newborn Girl
The size of my box is 4' 'Ñ… 4'' Ñ…4''
Let's see how it is made.
Supplies:
Cardstock for base box - 2 pc 12'' Ñ… 12''
White cardstock for cut - 1 pc A4
Patterned Paper: 4 pc 12'' Ñ… 12''
1.  Prepare cardstock for base box - 12'' Ñ… 12''. Fold it at 4'' and 8" on both sides. Cut the folded lines as it is shown on the picture.
2. I make the cover for box. Prepare scrapbookpaper for cover 5,59'' Ñ… 5,59''
Fold it at 0,78'' on all sides. Cut the folded lines as it is shown on the picture.
3. I glued the cover
4. Let's decorate with papers!
Prepare the details for our Box - cut out 8 details from paper sheets:
10 pc - 3,75''
4 pc - 3,4''
5. I glue the paper
6. Inside too
8. Glued the die-cuts as it is shown on the picture with help glue tape


9. Here is how I put the flower together. The flower has 3 pieces. I die cut them out with paper. 
10. After the flowers are die cut and inked
11. I used my  special tool to curl the edges to get the fibers lose.
12.  Here is the finished flowers.
13. Our Box is ready 


So cute, isn't it?)
Finally adding some crystals!))

I hope you enjoy the tutorial and will be happy to inspire you!
Also, did you know that we are having a challenge for our fans and followers to display the cards you have made with CottageCutz dies? There are prizes to be won as well.Click here for all the details. I hope you will join in on the fun!